Prerequisite Guides
Supplemental Guides
You Will Need
| ESP8266 NodeMCU |
| MicroUSB Cable |
| Computer running Windows, Linux, or MacOSX |
Setup
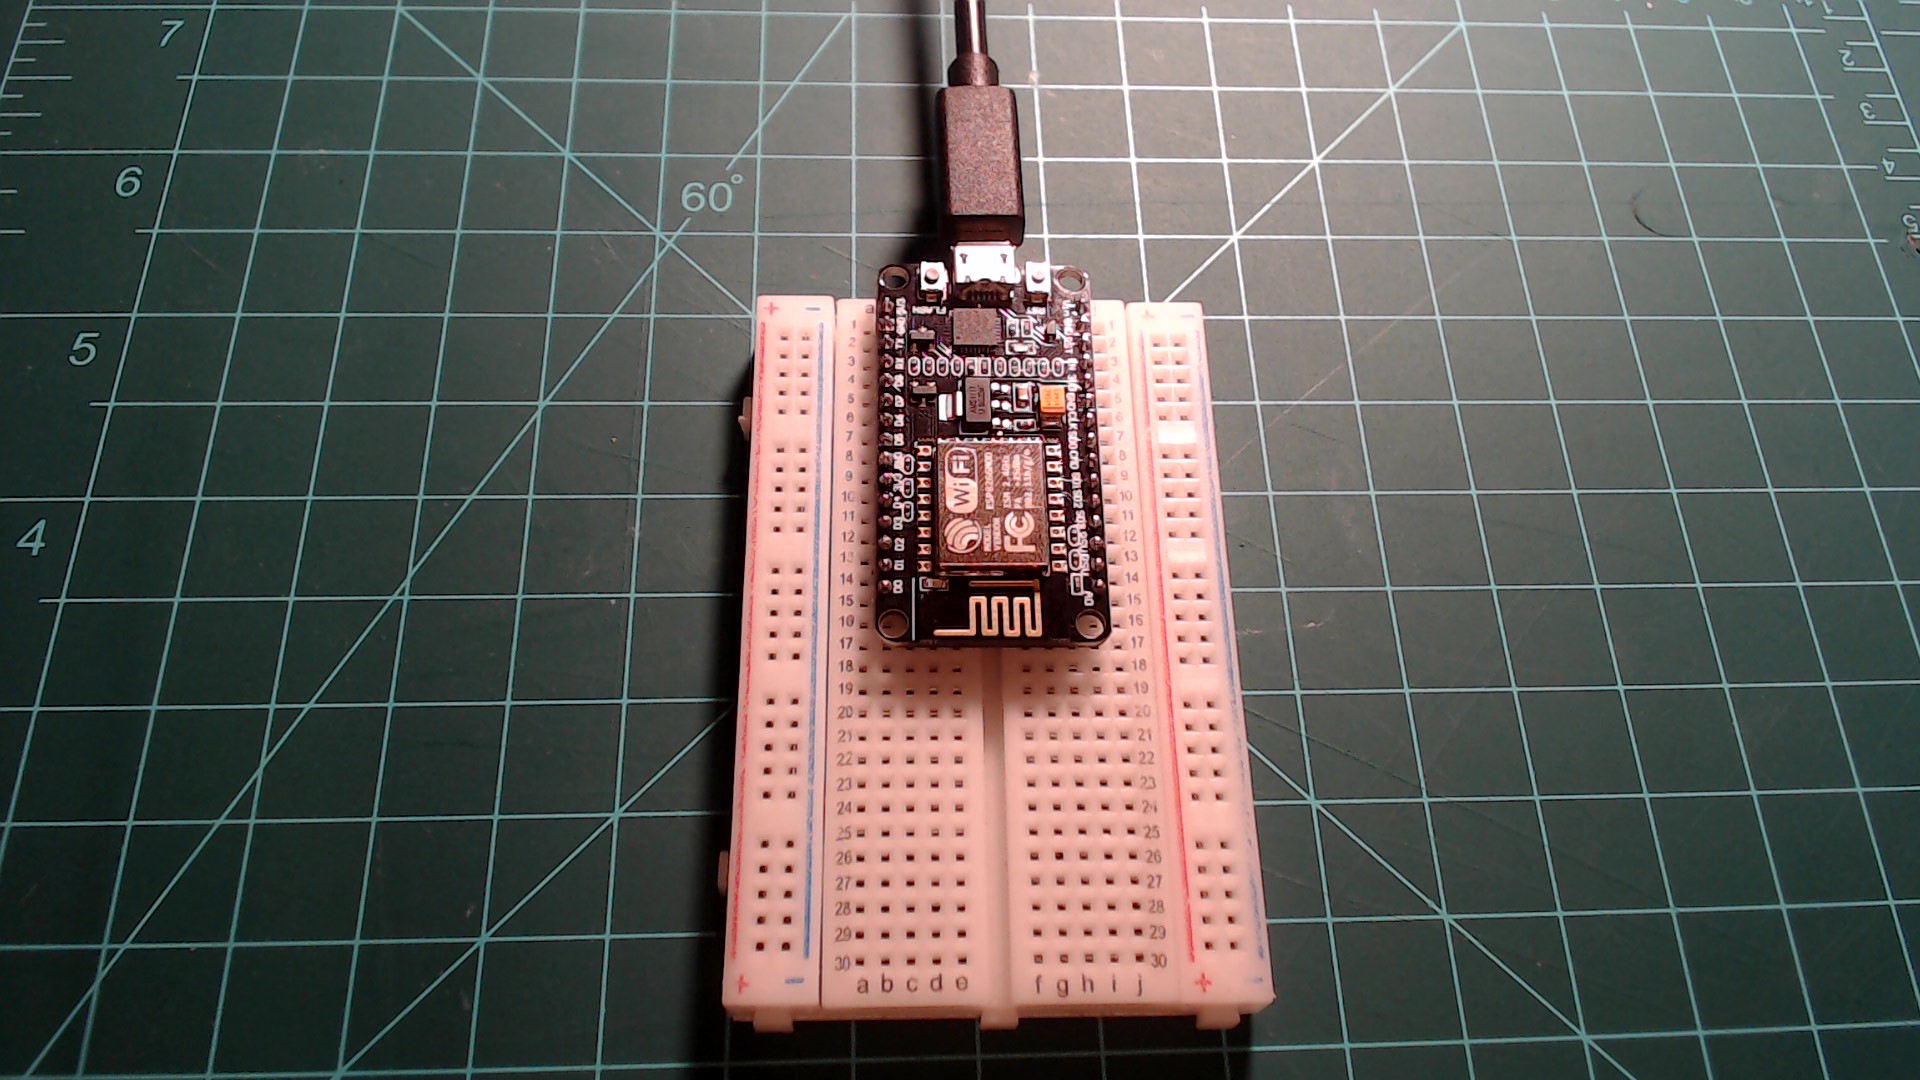
For this guide, all you need to do is connect the NodeMCU to your computer with a microUSB cable.
The breadboard is not required for this guide.
 |
What’s an API?
API stands for “application programming interface”. In simple terms, an API defines how multiple software components should interact. A good analogy for an API is a waiter at a restaurant. At a restaurant you can choose what you want from a list of options on a menu. You then tell your request to the waiter, who delivers the information to the kitchen. The kitchen will generate the appropriate food in response to your request and the waiter will deliver it back to your table. The kitchen in this analogy is the computer server which is hosting the API.
Get Access to the API
In this guide we will be using a service from OpenWeather. OpenWeather provides global weather data through their API. To get access to their API you will need to sign up on openweathermap.org.
Click the “Sign In” button at the top of the page and then click the “Create an Account” link. Next, enter in a username, password, and email. Check the required boxes and submit the form. After submitting you should be prompted to answer a “How and where you will use our API?” prompt. Answer this as accurately as possible. Go to the inbox of the email you entered into the form and search for an email with a subject of “OWM Team”. Open it and click on the “Verify your email” button. This will link you back to the OpenWeather website.
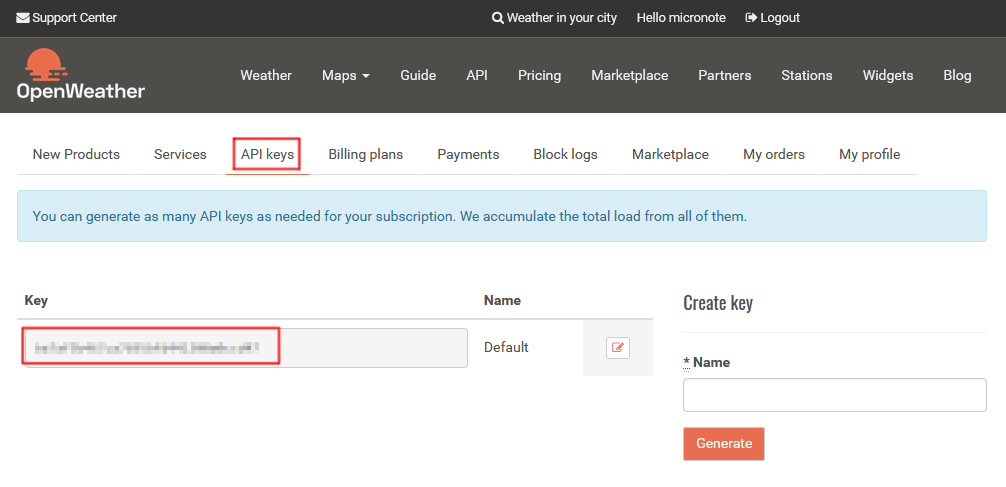
If you go to the tab labeled “API keys” you will see a key with the name “Default”. The key itself is simply a long string of letters and numbers. This key is needed when making an API call to OpenWeather, so keep this page open. This key identifies your account when making an API call.
API keys tab and the default API key.
 |
At this point if you already know how to make an API call, then you can skip to the section called: “API Call with an ESP8266 NodeMCU and MicroPython”.
API Call with Your Browser
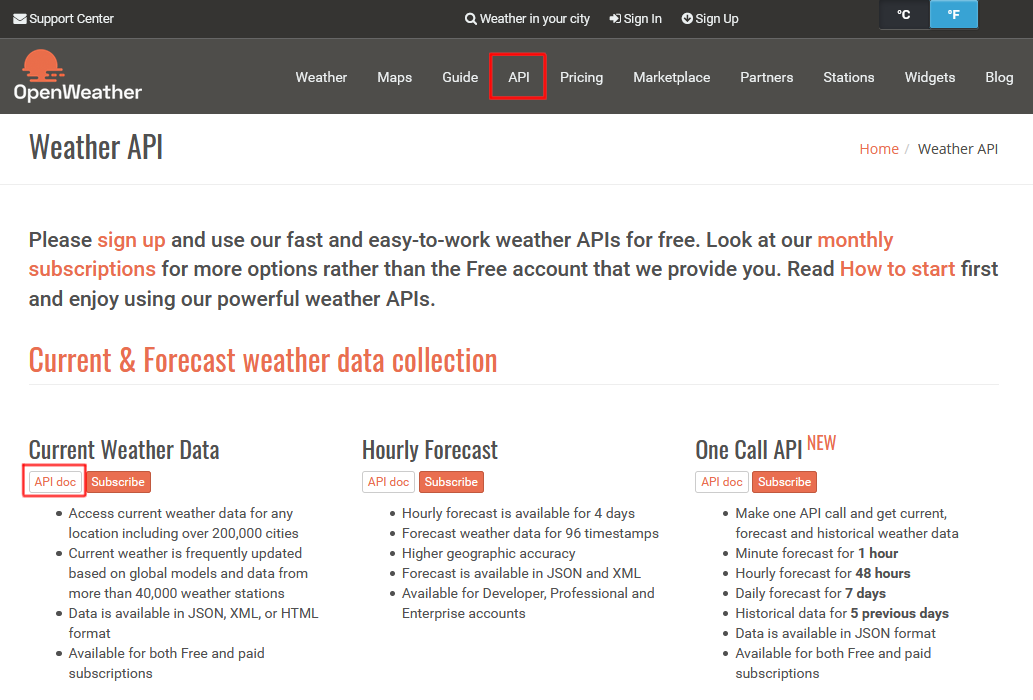
Open the tab at the top of the OpenWeather page labeled “API”. In the window that opens you will see a list of all of the available OpenWeather services. In this guide we will be using the first service listed on the page called “Current Weather Data”. This service gets the current weather data for a specified location. Click on the small button under the service name that says “API Doc”.
OpenWeather's services.
 |
The page that opens describes how to construct an API call using a variety of parameters. The page also provides sample calls in each section, these example calls are not real API calls. They give sample information to demonstrate what kind of data is output. Instead of copying the examples, copy the first api call format under the “API call” subsection of the “By city name” section. It looks like this:
api.openweathermap.org/data/2.5/weather?q={city name}&appid={your api key}
Paste this string into the URL bar on your browser, but do not execute it. Before the call is made, the two bracketed parameters need to be replaced with the name of your city of choice and your API key from before. Below is an example call to get the weather for Minneapolis, Minnesota. The API key that I have in the example below is one that I made up. It is a good idea to keep your API keys private so no one else can use your account to make calls.
api.openweathermap.org/data/2.5/weather?q=Minneapolis&appid=abcdefghijklmnop1234567891234567
Once you have replaced the placeholders with your parameters you can execute the complete URL in your browser. Before going further, if you immediately see something that looks like the response below and you are sure that you have copied your API key directly, wait a few minutes and then try again. When you make a new account with this API the key isn’t always immediately ready to use.
{"cod":401, "message": "Invalid API key. Please see http://openweathermap.org/faq#error401 for more info."}'
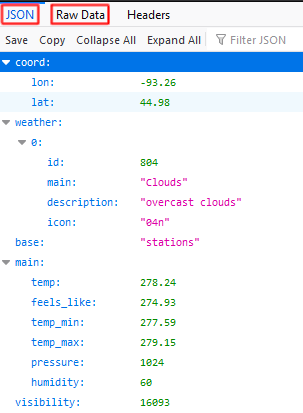
When you successfully navigate to this url in your browser you won’t see nice looking webpage like you would usually see when casually browsing the internet. Instead you will see data in a format called “JSON”. JSON stands for JavaScript Object Notation. It is a data format that stores data using key-value pairs. If you are using a modern browser it likely has tools that organize this JSON into a nice looking format so it can be easily looked through.
Firefox features collapsible tabs that assist in looking through JSON data.
 |
In it’s raw format it looks like a long string of data separated with curly brackets “{}”. Below is the raw format followed by the more organized “pretty” format of the JSON response.
{"coord":{"lon":-93.26,"lat":44.98},"weather":[{"id":804,"main":"Clouds","description":"overcast clouds","icon":"04n"}],"base":"stations","main":{"temp":282.4,"feels_like":277.18,"temp_min":281.48,"temp_max":283.15,"pressure":1020,"humidity":61},"visibility":16093,"wind":{"speed":5.1,"deg":330},"clouds":{"all":90},"dt":1588759872,"sys":{"type":1,"id":4984,"country":"US","sunrise":1588762469,"sunset":1588814683},"timezone":-18000,"id":5037649,"name":"Minneapolis","cod":200}
{
  "coord": {
    "lon": -93.26,
    "lat": 44.98
  },
  "weather": [
    {
      "id": 804,
      "main": "Clouds",
      "description": "overcast clouds",
      "icon": "04n"
    }
  ],
  "base": "stations",
  "main": {
    "temp": 282.4,
    "feels_like": 277.18,
    "temp_min": 281.48,
    "temp_max": 283.15,
    "pressure": 1020,
    "humidity": 61
  },
  "visibility": 16093,
  "wind": {
    "speed": 5.1,
    "deg": 330
  },
  "clouds": {
    "all": 90
  },
  "dt": 1588759872,
  "sys": {
    "type": 1,
    "id": 4984,
    "country": "US",
    "sunrise": 1588762469,
    "sunset": 1588814683
  },
  "timezone": -18000,
  "id": 5037649,
  "name": "Minneapolis",
  "cod": 200
}
If you got JSON data for your city of choice as a response, then you have successfully made an API call. If you wish to know what all of the data in the response means, there is a section on the “API Doc” page called “Weather parameters in API response” where the data is explained.
API Call with Python 3
Before we get into making an API call with MicroPython you should understand how to make one in ordinary Python 3. In this section we will make an API call using the “requests” Python library. If you don’t have Python 3 installed on your computer, you should install it now from the Python 3 website.
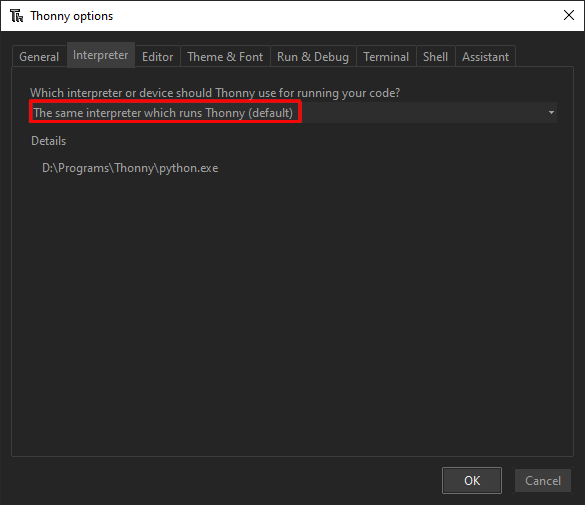
Select the Interpreter
Open Thonny and navigate to “Run > Select Interpreter”. Under the label “Which interpreter or device should Thonny use for running your code?” select “The same interpreter which runs Thonny (default)”.
Select a Python3 interpreter for Thonny to use.
 |
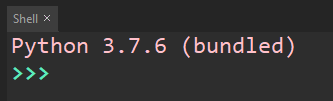
After you select the new interpreter and the dialog closes, you should see that the shell window at the bottom of Thonny has changed and should now indicate the new interpreter you are using. It should say “Python 3.X.X” followed by “(bundled)”.
The shell tab in Thonny indicates which interpreter is being used.
 |
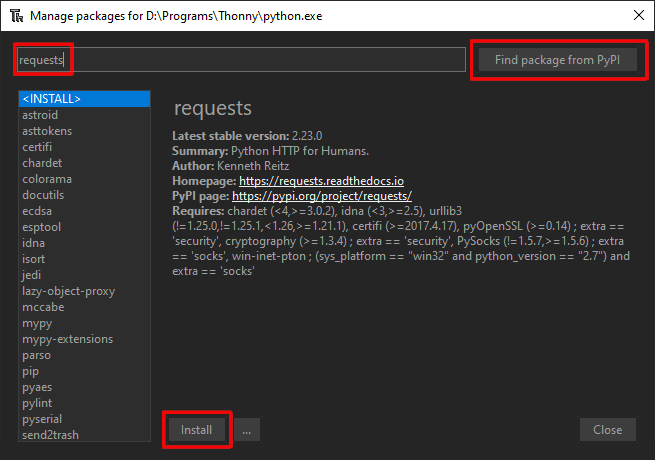
Install Requests
To install the requests package, navigate to “Tools > Manage packages…”. In the search bar, types in “requests” and search for it by clicking the “Find package from PyPI” button. The entry for the requests package should appear. Click the “Install” button to install the package.
Install the requests package using the Thonny package manager.
 |
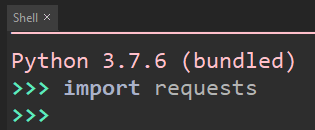
When requests has finished installing, close the window. To test your installation, go to the shell tab and in the open REPL enter “import requests”. If you do not get an error, then you have successfully installed the package.
No error given, so the requests package is installed.
 |
Write the Code
Enter the following code into the Thonny editor replacing the “q” and “appid” items in the “parameters” dictionary with the name of your city of choice and your API key respectively:
import requests

parameters = {
    "q": "Minneapolis",
    "appid": "abcdefghijklmnop1234567891234567",
}

response = requests.get("https://api.openweathermap.org/data/2.5/weather", params=parameters) # make the api call

print("API call: " + response.url)
print("Response: " + str(response.content))

weather_data = response.json() # create a dictionary of the response content
This code saves the API response in the variable “response” and then adds the response content to a dictionary called “weather_data”. Press the play button at the top of the Thonny window to run the script (it may prompt you to save it first). This script should print out the url of the API call that was created using your parameters along with the full JSON response. If you get an error, make sure that your information is correct.
The last line in the script converts the API response to a dictionary and saves it in a variable called “weather_data”. To see all of the data items in the response, the following command can be executed in the REPL. It returns a list of dictionary keys.
Below is the data that this command returned for me:
dict_keys(['coord', 'weather', 'base', 'main', 'visibility', 'wind', 'clouds', 'dt', 'sys', 'timezone', 'id', 'name', 'cod'])
We can then use these keys to access their respective data in the response dictionary. For example one of the keys in the dictionary that was listed from the previous command should have been “main”. Let’s see what data is listed when we look at the data under the “main” key.
Below is the data that was returned for me:
{'temp': 288.33, 'feels_like': 283.64, 'temp_min': 287.15, 'temp_max': 289.26, 'pressure': 1017, 'humidity': 58}
As you can see this is a lot of the standard data you need for describing the weather. I encourage you to check out the data located under the other keys to get a sense for the rest of the data included in the response.
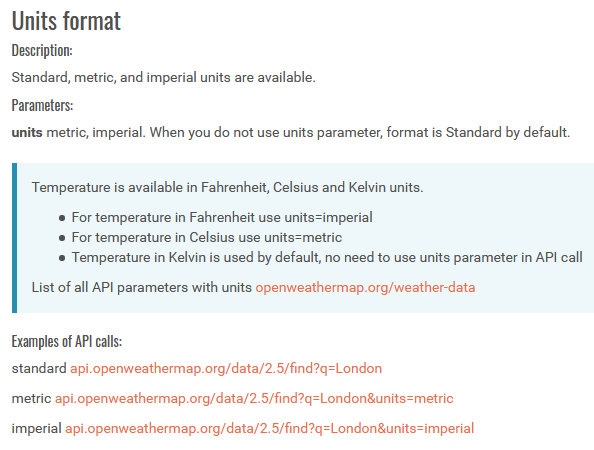
Let’s make one last change to the API call before continuing. The temperature data that was returned in the response above was in Kelvin units. Let’s look at the API doc page and see if there is a way to get the temperature data in a more common unit. There is a subsection of the “Other features” section in the API doc page called “Units format” here is says that we can specify a desired units format by specifying either “units=imperial” or “units=metric”.
The API doc contains information for constructing an API call.
 |
Let’s change the “parameters” dictionary in the Python script to get the temperature in more familiar units.
...
parameters = {
    "q": "Minneapolis",
    "appid": "abcdefghijklmnop1234567891234567",
    "units": "imperial",
}
...
Running this script with the updated dictionary will give you a response with your units of choice.
API Call with an ESP8266 NodeMCU and MicroPython
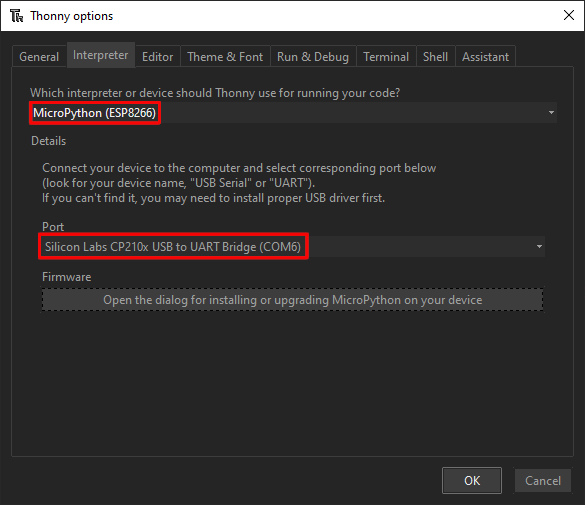
At this point you should already know the basics of making an API call and have access to the OpenWeather API. In this section we will be making the API call on an ESP8266 NodeMCU using MicroPython. Plug your ESP8266 NodeMCU into your computer and open Thonny. If you previously set your interpreter to Python 3, you need to change it back to MicroPython. To do that go to “Run > Select Interpreter” and under the label “Which interpreter or device should Thonny use for running your code?” make sure that “MicroPython (ESP8266)” is selected. Then under the “Port” label, select the port of the NodeMCU that you just plugged in.
Select the ESP8266 MicroPython interpreter.
 |
After setting your interpreter and plugging in your device, make sure that you have a REPL available in the shell tab that is ready for commands >>> by pressing the stop sign button at the top of Thonny.
urlencode
One of the nice things that the requests library for Python 3 is its ability to construct a URL out of given parameters. The analog to requests in MicroPython is urequests (the “u” representing the greek letter mu). Unfortunately, urequests does not have this built in, but that does not mean we need to hard-code the URL. Instead we can use a function called “urlencode”, this function is supposed to be built into the MicroPython standard libraries and it should be able to be imported into your code. At the time of making this guide with MicroPython 1.12, I was unable to import it. You are welcome to try importing it with the code below (acquire a MicroPython REPL and enter in the code). If this code gives you an error, then you can follow the rest of this section to use the workaround that I used.
from urllib.parse import urlencode
If you got no error from the above code, skip to the next subsection, otherwise continue on. Download the parse.py file by clicking this link. Open it in Thonny. With the parse.py tab open, click “File > Save as..” and select “MicroPython Device”. In the “File name” field, enter “parse.py” and click “OK”. This file is a shortened version of the parse.py file that was supposed to be in urllib. It contains the urlencode function and all of the variables and functions it depends on.
Write the MicroPython Code
Now let’s write our main script to actually make the API call. Below is the code for connecting to wifi and then making an API call with the urequests library.
First the network and urequests libraries are imported. The last import gets us access to the urlencode function. You should have figured out in the previous subsection which line you need for your code. By default I’m assuming that you got an error when trying to import it from urllib.parse. If this was the case, leave the imports as is. If you were able to successfully import it from urllib.parse, then uncomment the second import line and comment out the third import line.
The next item in the script is a dictionary called “parameters” that specifies an API key and the requested data. Replace the value for “appid” with your OpenWeather API key and replace the values for the “q” and “units” keys with your city and units of choice respectively.
The next function in the script is the same connect_to_wifi function that we used in the previous guide, Introduction to Networking and ntptime with a NodeMCU and MicroPython.
The next function in the script is called “get”, which wraps around the get function that is part of “urequests”. This wrapper function simply uses the urlencode function that was imported to add all of the items in the “parameters” dictionary to the base url for the API. Feel free to uncomment the print statement in the function to print the full url when you run it.
Lastly, the script connects to the internet, makes the API call, and prints the response. The last line of the script defines a variable called “weather_data” which is set to the response converted to a Python dictionary.
Copy this code into a new file in the Thonny editor. Make the necessary changes to the parameters dictionary and replace the wifi credentials in the connect_to_wifi call with your wifi network’s name and password. Afterwards, save it to your NodeMCU as “main.py”. Press the reset button on the NodeMCU to run it. If you did everything correctly, you have a response printed to the REPL.
import network, urequests
#from urllib.parse import urlencode
from parse import urlencode # uncomment the above line and comment out this one if the code above worked in the REPL

parameters = {
    "q":"Minneapolis",
    "appid":"abcdefghijklmnop1234567891234567",
    "units":"imperial"
}

def connect_to_wifi(wlan, ssid, password):
    if not wlan.isconnected():
        print("Connecting to network...")
        wlan.connect(ssid, password)
        while not wlan.isconnected():
            pass

def get(url, params=None, **kw):
    if params:
        url = url.rstrip('?') + '?' + urlencode(params, doseq=True)
        #print("url with parameters: " + url)
    return urequests.get(url, **kw)

wlan = network.WLAN(network.STA_IF)
wlan.active(True)

connect_to_wifi(wlan, "ssid", "password")

response = get('https://api.openweathermap.org/data/2.5/weather', parameters)
print(response.text)
weather_data = response.json()
The last line of this script saves the API response in a variable called weather_data as a dictionary. You can access the data just like before in regular Python 3. For example, enter the following command into the REPL after running the script to see the data under the ‘main’ key.
Conclusion
This concludes this guide. If this is your first experience with APIs, I recommend that you head back over to the OpenWeather’s API Doc and explore the other features and parameters. I also recommend trying to combine making the API call with a physical output from the NodeMCU. For example, maybe try turning on an LED on the condition that the temperature outside above a certain value.
Next guide: I2C Bus with a NodeMCU and MicroPython